
Hey, guys welcome here and today we are going to tell you about that how to flash a custom rom via Odin and how to flash custom recovery via Odin in your Samsung smartphone. You can also flash stock firmware in Samsung devices via odin. Odin is the software which is made for Samsung devices only you can do all the things which are mention above in your Samsung smartphone. So without wasting the time lets get started to How To Flash a Custom ROM & Custom Recovery Via Odin.
Odin is a very useful Windows tool that lets you install stock firmware / flash Cuatom ROM on your Android device. Here is a step by step guide on how to use Odin to flash custom ROM on your Samsung smartphone
Be sure to backup your data including Contacts, SMS / MMS, APN & MMS Settings as well as photos and videos stored on your device’s internal or external storage.
Make sure that your device is well charged. Ideally, the battery level should be around 60-80%. The more the better.
USB Debugging should be enabled on your device.
Make sure that Samsung Kies is not running
1.Download Odin for Windows.
2.Custom ROM Zip
Note: We will not be responsible for any damage done to your device. Do it on your own risk.
First we are going to tell you about How To Flash Custom ROM via Odin in samsung devices.
Step 1: Download the official custom rom zip package for your device. Then extract the downloaded zip file. After extracting, you will either get one .tar / .tar.md5 file or will get multiple files.
If you get one file, it will have everything inside it: PDA + Phone + CSC.
If you get multiple files, there will be separate files for PDA, Phone & CSC.
Step 2: Download Odin3_v3.04.zip and extract the downloaded zip file. You will get following files:
1.Odin3 v3.04.exe
2.tmax.dll
3.zlib.dll
4.Odin3.ini
Step 3: Right click on Odin3 v3.04.exe and run it as administrator to start Odin.
Step 4: Boot your device in download mode. For most Samsung devices, you will need to do this:
Switch your device off.
Press & hold Power + Home + Volume down buttons till you see a triangle and Android robot.
Now press the Volume up button to confirm entering the download mode.
Step 5: Once it is in download mode, connect your device to the computer via USB cable.
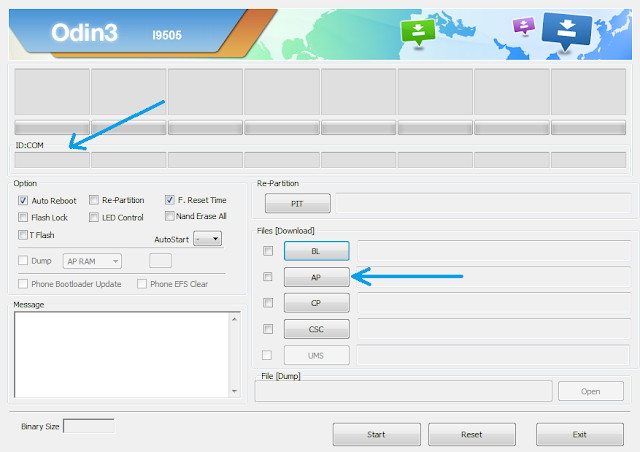
When your device is connected, one of Odin ID:COM boxes will turn yellow and display the COM port number
Step 6: If the rom zip package had just one file, click on PDA button, then browse and select the firmware file (.tar or .tar.md5).
If the firmware package had multiple files:
Click on PDA button, then browse and select the file that has CODE / PDA in its name.
Click on Phone button and select the file that has MODEM in its name.
Click on CSC button and select the file with CSC in its name.
Skip any files that you did not find in the package.
Make sure that you do not mess up with checkboxes:
Auto Reboot and F. Reset Time checkboxes should be selected
All other checkboxes should be unchecked.
After selecting the appropriate files, click on “Start” button in Odin.
This will kick off the process to flash the ROM. Please do not disconnect your device during the process. Once flashing is complete, your device will reboot. You can now disconnect from the PC and start using it. SO guys this is all about How To Flash Custom ROM via Odin in samsung devices.
That’s it. You can use these steps to flash custom ROM on your samsung device using Odin.
Now We are going to talk about How To Flash/Install Custom Recovery via Odin in Samsung devices
How To Flash/Install Custom Recovery via Odin
Custom recovery developed and maintained by the folks over at TeamWin. Using TWRP, you can take full device (nandroid) backups, plus install/flash rooting scripts like SuperSU, Custom ROMs/MODs and other similar stuff. TWRP recovery is available as both official and unofficial builds.
Step 1: Unzip the file and run/open Odin.exe file from the extracted files on your PC.
Make sure you’ve downloaded a Odin flashable TWRP recovery .tar file compatible for your device.
(If applicable) Enable OEM unlock:
Go to Settings » About phone » and tap Build number seven times to enable Developer options.
Step 2: Go back to main Settings page, scroll to bottom and select Developer options from there.
Step 3: Under Developer options, look for Enable OEM unlock checkbox/toggle and enable it.
Boot your device into Download mode:
Switch off your device.
Press and hold “Home + Power + Volume down” buttons for a few seconds until you see a warning screen.
Press Volume Up on the warning screen to accept it and boot into Download mode.
Step 4: Once your device is in download mode, connect it to the PC with a USB cable. The Odin window on PC should detect the device and show an “Added!!” message.
Step 5: Now click on the AP tab on Odin window and select the TWRP recovery .tar file that you downloaded for your device.
Note: DON’T play with any other options on the screen. You’re only required to connect your device and select the TWRP recovery .tar file in the AP tab.
Step 6: Click the Start button on Odin and wait for it to finish the process. Once it has finished successfully, you’ll see a pass message on the Odin screen.
Your device will automatically reboot when Odin is done flashing. You can then disconnect your device.
So guys this is all about How To Flash a Custom ROM & Custom Recovery Via Odin follow the steps carefully and if you need any help just comment below we will reply you asap. Keep visiting <3

Odin is a very useful Windows tool that lets you install stock firmware / flash Cuatom ROM on your Android device. Here is a step by step guide on how to use Odin to flash custom ROM on your Samsung smartphone
Before You Start
Install USB drivers for your device on your PC. You can download and install Samsung Kies which will automatically install device drivers.Be sure to backup your data including Contacts, SMS / MMS, APN & MMS Settings as well as photos and videos stored on your device’s internal or external storage.
Make sure that your device is well charged. Ideally, the battery level should be around 60-80%. The more the better.
USB Debugging should be enabled on your device.
Make sure that Samsung Kies is not running
Downloads
1.Download Odin for Windows.2.Custom ROM Zip
Note: We will not be responsible for any damage done to your device. Do it on your own risk.
How To Flash a Custom ROM & Custom Recovery Via Odin
First we are going to tell you about How To Flash Custom ROM via Odin in samsung devices.
Step 1: Download the official custom rom zip package for your device. Then extract the downloaded zip file. After extracting, you will either get one .tar / .tar.md5 file or will get multiple files.
If you get one file, it will have everything inside it: PDA + Phone + CSC.
If you get multiple files, there will be separate files for PDA, Phone & CSC.
Step 2: Download Odin3_v3.04.zip and extract the downloaded zip file. You will get following files:
1.Odin3 v3.04.exe
2.tmax.dll
3.zlib.dll
4.Odin3.ini
Step 4: Boot your device in download mode. For most Samsung devices, you will need to do this:
Switch your device off.
Press & hold Power + Home + Volume down buttons till you see a triangle and Android robot.
Now press the Volume up button to confirm entering the download mode.
Step 5: Once it is in download mode, connect your device to the computer via USB cable.
When your device is connected, one of Odin ID:COM boxes will turn yellow and display the COM port number
Step 6: If the rom zip package had just one file, click on PDA button, then browse and select the firmware file (.tar or .tar.md5).
If the firmware package had multiple files:
Click on PDA button, then browse and select the file that has CODE / PDA in its name.
Click on Phone button and select the file that has MODEM in its name.
Click on CSC button and select the file with CSC in its name.
Skip any files that you did not find in the package.
Make sure that you do not mess up with checkboxes:
Auto Reboot and F. Reset Time checkboxes should be selected
All other checkboxes should be unchecked.
After selecting the appropriate files, click on “Start” button in Odin.
This will kick off the process to flash the ROM. Please do not disconnect your device during the process. Once flashing is complete, your device will reboot. You can now disconnect from the PC and start using it. SO guys this is all about How To Flash Custom ROM via Odin in samsung devices.
That’s it. You can use these steps to flash custom ROM on your samsung device using Odin.
Now We are going to talk about How To Flash/Install Custom Recovery via Odin in Samsung devices
How To Flash/Install Custom Recovery via Odin
Custom recovery developed and maintained by the folks over at TeamWin. Using TWRP, you can take full device (nandroid) backups, plus install/flash rooting scripts like SuperSU, Custom ROMs/MODs and other similar stuff. TWRP recovery is available as both official and unofficial builds.
Step 1: Unzip the file and run/open Odin.exe file from the extracted files on your PC.
Make sure you’ve downloaded a Odin flashable TWRP recovery .tar file compatible for your device.
(If applicable) Enable OEM unlock:
Go to Settings » About phone » and tap Build number seven times to enable Developer options.
Step 2: Go back to main Settings page, scroll to bottom and select Developer options from there.
Step 3: Under Developer options, look for Enable OEM unlock checkbox/toggle and enable it.
Boot your device into Download mode:
Switch off your device.
Press and hold “Home + Power + Volume down” buttons for a few seconds until you see a warning screen.
Press Volume Up on the warning screen to accept it and boot into Download mode.
Step 4: Once your device is in download mode, connect it to the PC with a USB cable. The Odin window on PC should detect the device and show an “Added!!” message.
Step 5: Now click on the AP tab on Odin window and select the TWRP recovery .tar file that you downloaded for your device.
Note: DON’T play with any other options on the screen. You’re only required to connect your device and select the TWRP recovery .tar file in the AP tab.
Step 6: Click the Start button on Odin and wait for it to finish the process. Once it has finished successfully, you’ll see a pass message on the Odin screen.
Your device will automatically reboot when Odin is done flashing. You can then disconnect your device.
So guys this is all about How To Flash a Custom ROM & Custom Recovery Via Odin follow the steps carefully and if you need any help just comment below we will reply you asap. Keep visiting <3

The files I have after extracting are boot.img and system.new.dat along with other small files. None were of the suggested formats.
ReplyDelete